Versions Compared
| Version | Old Version 14 | New Version Current |
|---|---|---|
| Changes made by | ||
| Saved on |
Key
- This line was added.
- This line was removed.
- Formatting was changed.
Introduction
| Excerpt |
|---|
The Logica Patient Data Manager app is a SMART on FHIR application that is used for managing the data of a single patient. |
- Create/update demographic data
- Create/update/delete clinical data
- Provide data support for showcasing other healthcare apps
- Provide data support for showcasing CDS hooks apps
- Provide data support for showcasing backend systems

Launching Patient Data Manager
The HSPC The Logica Patient Data Manager requires a patient to be in context. It can be launched from Sandbox Manager by selecting the Patients menu, selecting the desired Patient, then clicking the Open Patient Data Manager button.
Creating a New Resource
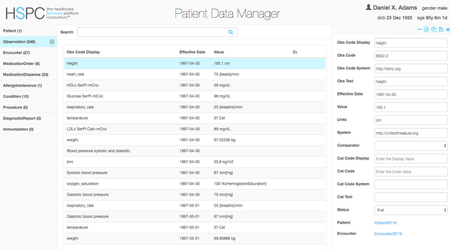
On the left side of Patient Data Manager, there is a list of supported FHIR Resources. When you select one of these resources, (with the exception of Patient) you will see a small + to the right of the Resource name. This + button allows you to create a new Resource of the given type. The modal dialog which opens to create a Resource gives you a list of the most common attributes for the Resource type. Fill in the desired values and click the Create button.
Update a Resource
Select a resource on the left side of Patient Data Manager. Then select the desired Resource in the list in the center. A details pane will display on the right side. You can make modifications in the details pane and then save you changes by clicking the save icon on the top right of the details pane.
Delete a Resource
Select a resource on the left side of Patient Data Manager. Then select the desired resource in the list in the center. A details pane will display on the right side. You can delete the selected resource by clicking the ... (ellipsis) icon on the top right of the details pane and select Delete from the list.
Clone a Resource
Select a resource on the left side of Patient Data Manager. Then select the desired resource in the list in the center. A details pane will display on the right side. You can clone the selected resource by clicking the ... (ellipsis) icon on the top right of the details pane and select Clone from the list. The modal dialog which opens to clone a resource gives you a list of the most common attributes for the resource type pre-filled with the values from the cloned resource. Make any desired changed and click the Create button.
Modify Any Attribute of a Resource with FRED
Select a resource on the left side of Patient Data Manager. Then select the desired resource in the list in the center. A details pane will display on the right side. You can open the selected resource in FRED by clicking the ... (ellipsis) icon on the top right of the details pane and select FRED from the list. Make desired modification in FRED. Then choose Save and Close. In Patient Data Manager you will need to save the modified resource by clicking the save icon on the top right of the details pane.
Retrieve the JSON for a Resource
Select a resource on the left side of Patient Data Manager. Then select the desired resource in the list in the center. A details pane will display on the right side. You can display the selected resource's JSON by clicking the ... (ellipsis) icon on the top right of the details pane and select JSON from the list. The modal dialog which opens contains the JSON for the given resource. You can select and copy the JSON from this dialog.
Try it Out
| HSPC GalleryLogica Gallery |
|---|
| http://sandbox.hspconsortiumlogicahealth.org |
Get the Source Code
Bitbucket
| Clone using HTTPS |
|---|
| git clone https://bitbucket.org/hspconsortium/patient-data-manager.git |
| Go to the Repo |
| https://bitbucket.org/hspconsortium/patient-data-manager |